


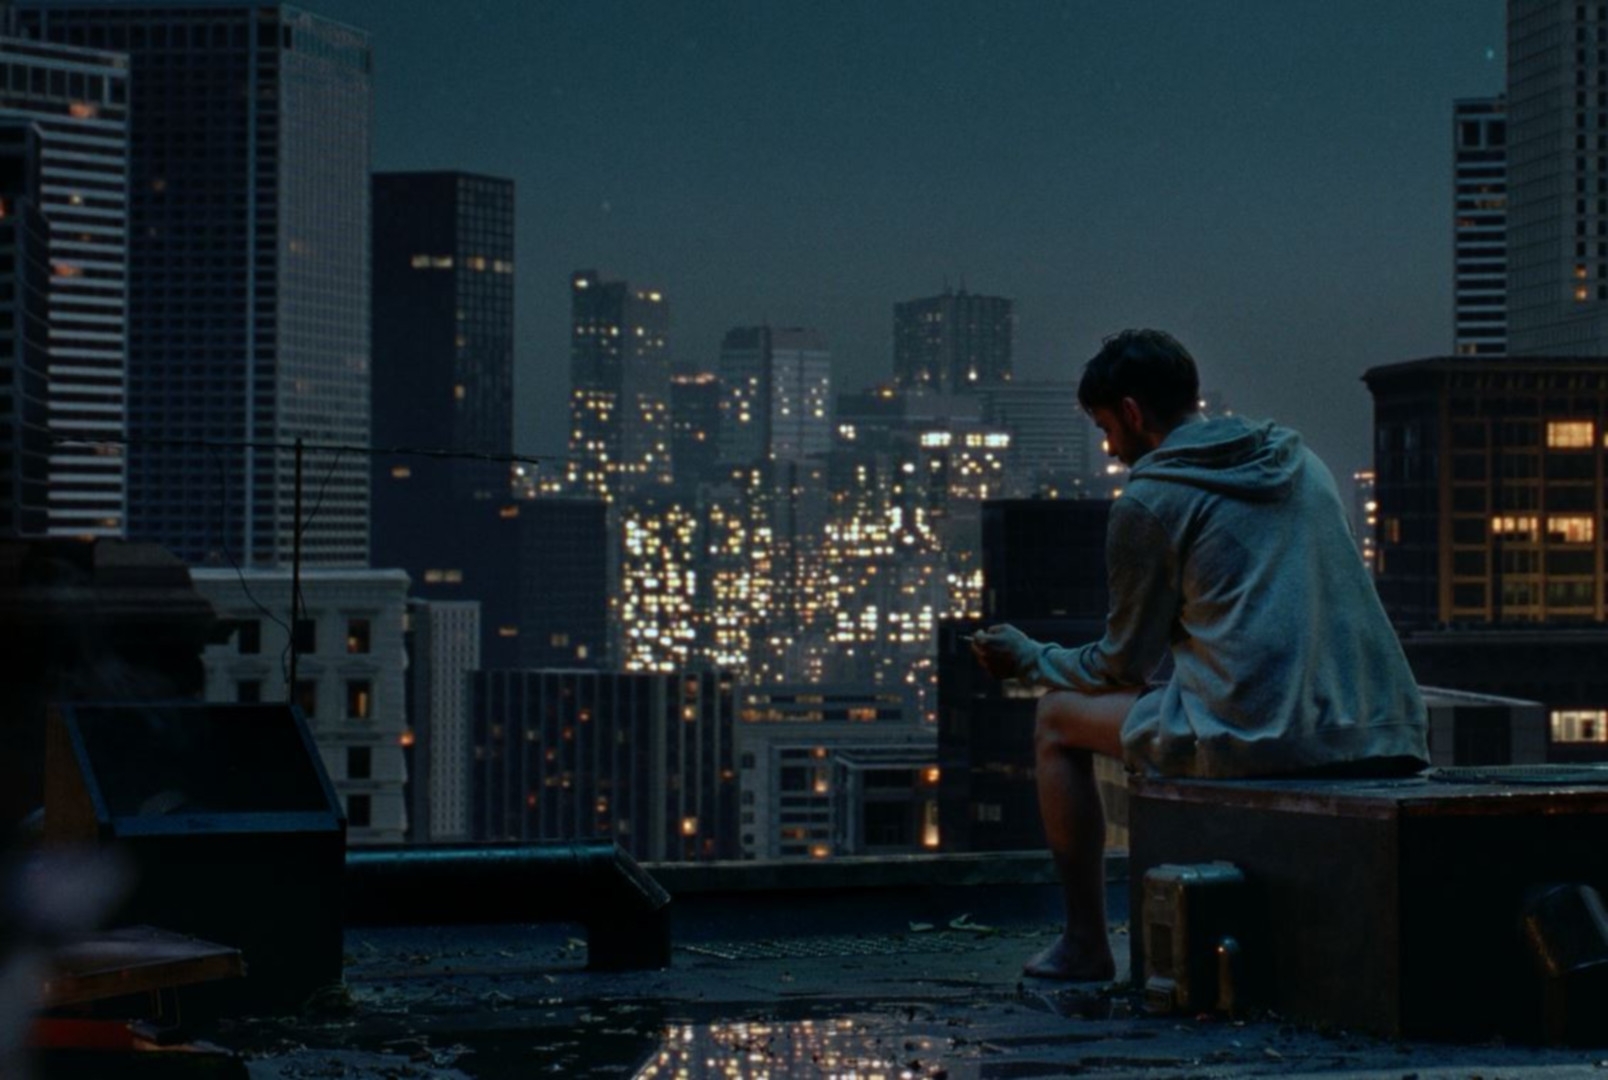
The premise of “What you don’t see” was to prove that shooting on analogue film stock in an LED volume is possible, despite widespread scepticism, and to uncover the benefits and challenges associated with it. Together with HYPERBOWL, Studio L’Equipe, ARRI Rental Munich, SILBERSALZ and oh, boy! films, they carried out a series of tests and used the knowledge gained to realise a 2-minute narrative short film.
We caught up with the three people behind the film – Luis Zappe, Sebastian Burk and Samuel Ramm. They are a team of students and alumni of Stuttgart Media University. The project was carried out as part of two final theses, with other partners joining in as the project progressed, and Samuel Ramm as director. The social advert “Was du nicht siehst” was produced with the support of Stuttgart-based production company Oh, boy! films GmbH.
DP: How did you come up with the idea of going into a virtual production stage with film?
Luis Zappe: The question of whether analogue is possible in a volume raises the question of why you should actually do it: The basic idea was that every tool in film has its raison d’être and is the right one for a particular use case. Both film and the LED volume as tools have advantages and disadvantages that make them practical or impractical depending on the requirements of a project. Film has a look coveted by many filmmakers due to its grain, contrasts and colours as well as highlight roll-off, softness and natural skin tones, but shows weaknesses in dark scenes compared to modern digital cameras because its light yield, and especially the dynamic range in the depths, is comparatively low.
The LED volume, on the other hand, offers great creative freedom as the virtual background can be designed as desired and its brightness, colours and contrasts can be precisely adjusted, but also harbours risks such as moiré artefacts and unfavourable skin tones, which result from the interaction between digital cameras and the nature of current LED walls. We wanted to investigate to what extent analogue film with its organic look can counteract these “digital” artefacts – or how the LED volume, by precisely controlling the brightness of the virtual environment, can help to shoot night and twilight scenes on film. The idea came to me during a co-operative project between the Babelsberg Film University and the Stuttgart Media University in the Halostage near Berlin. What would happen if you implemented an analogue camera in an otherwise completely digitalised filming environment?
Sebastian and I initiated the project as part of our two bachelor theses to get to the bottom of this question. The script and concept of the advert were therefore not only based on creative requirements, but also on the specific questions we wanted to investigate. This was also a particular balancing act for writer and director Samuel Ramm.
DP: And before we get into the details: What were you filming on?
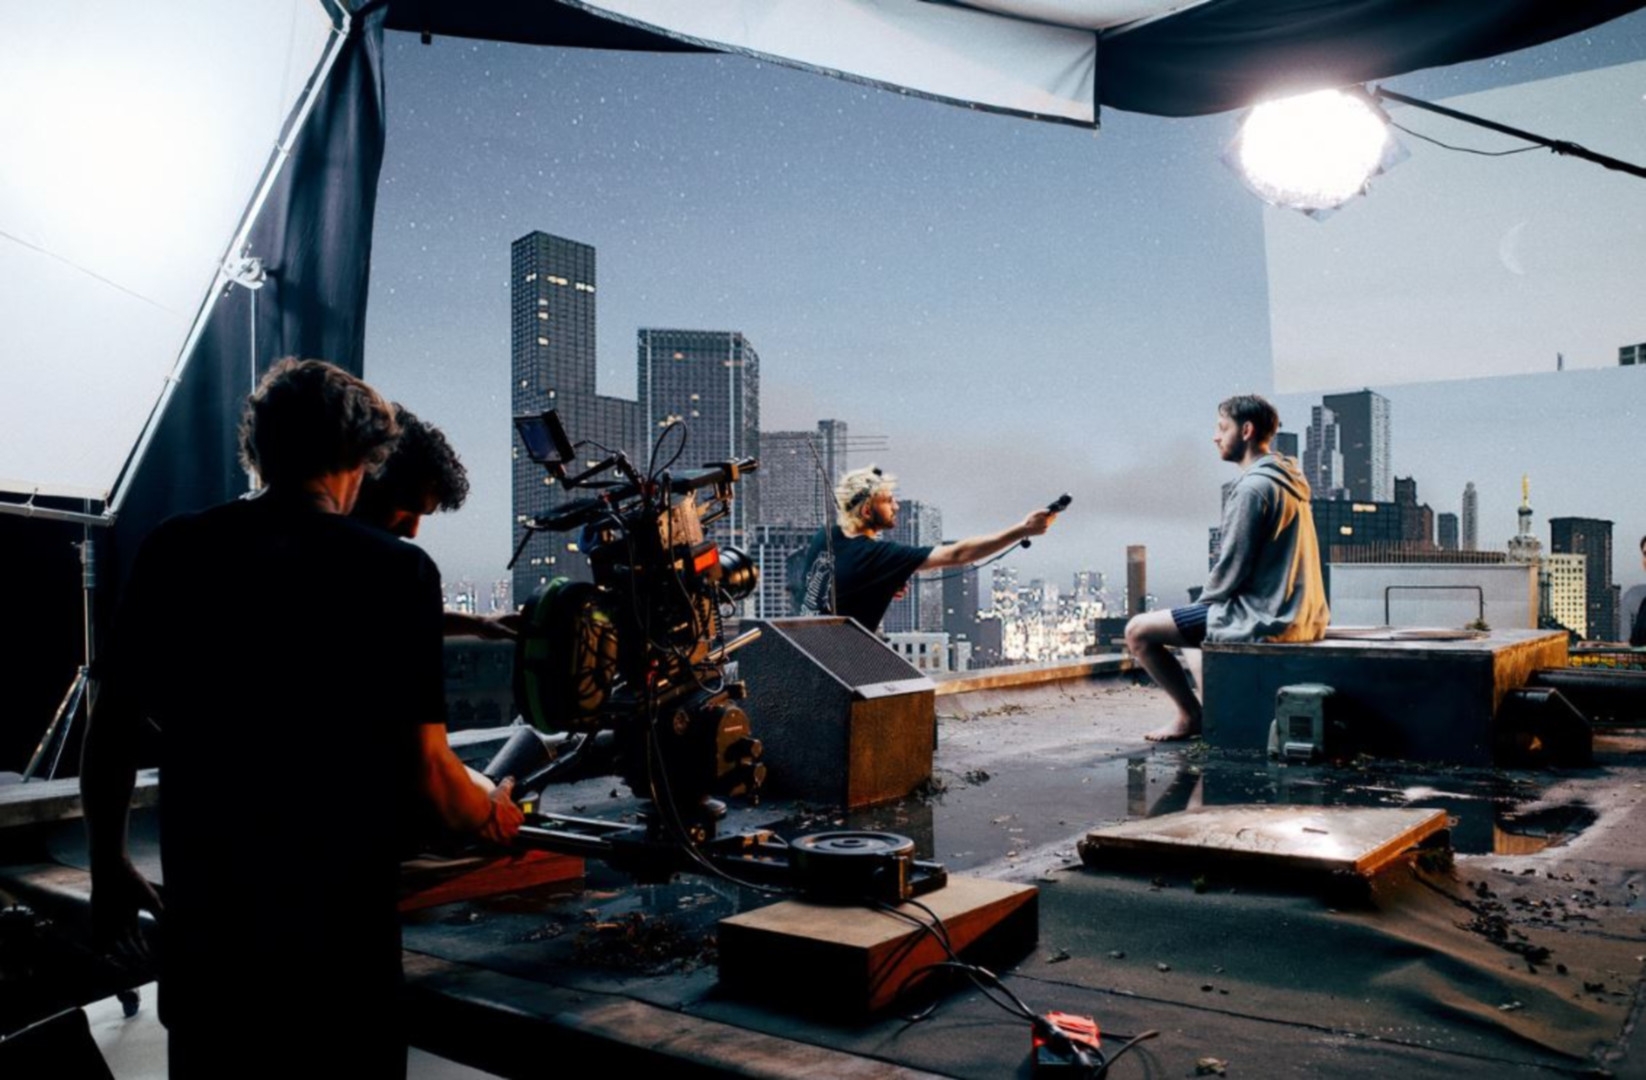
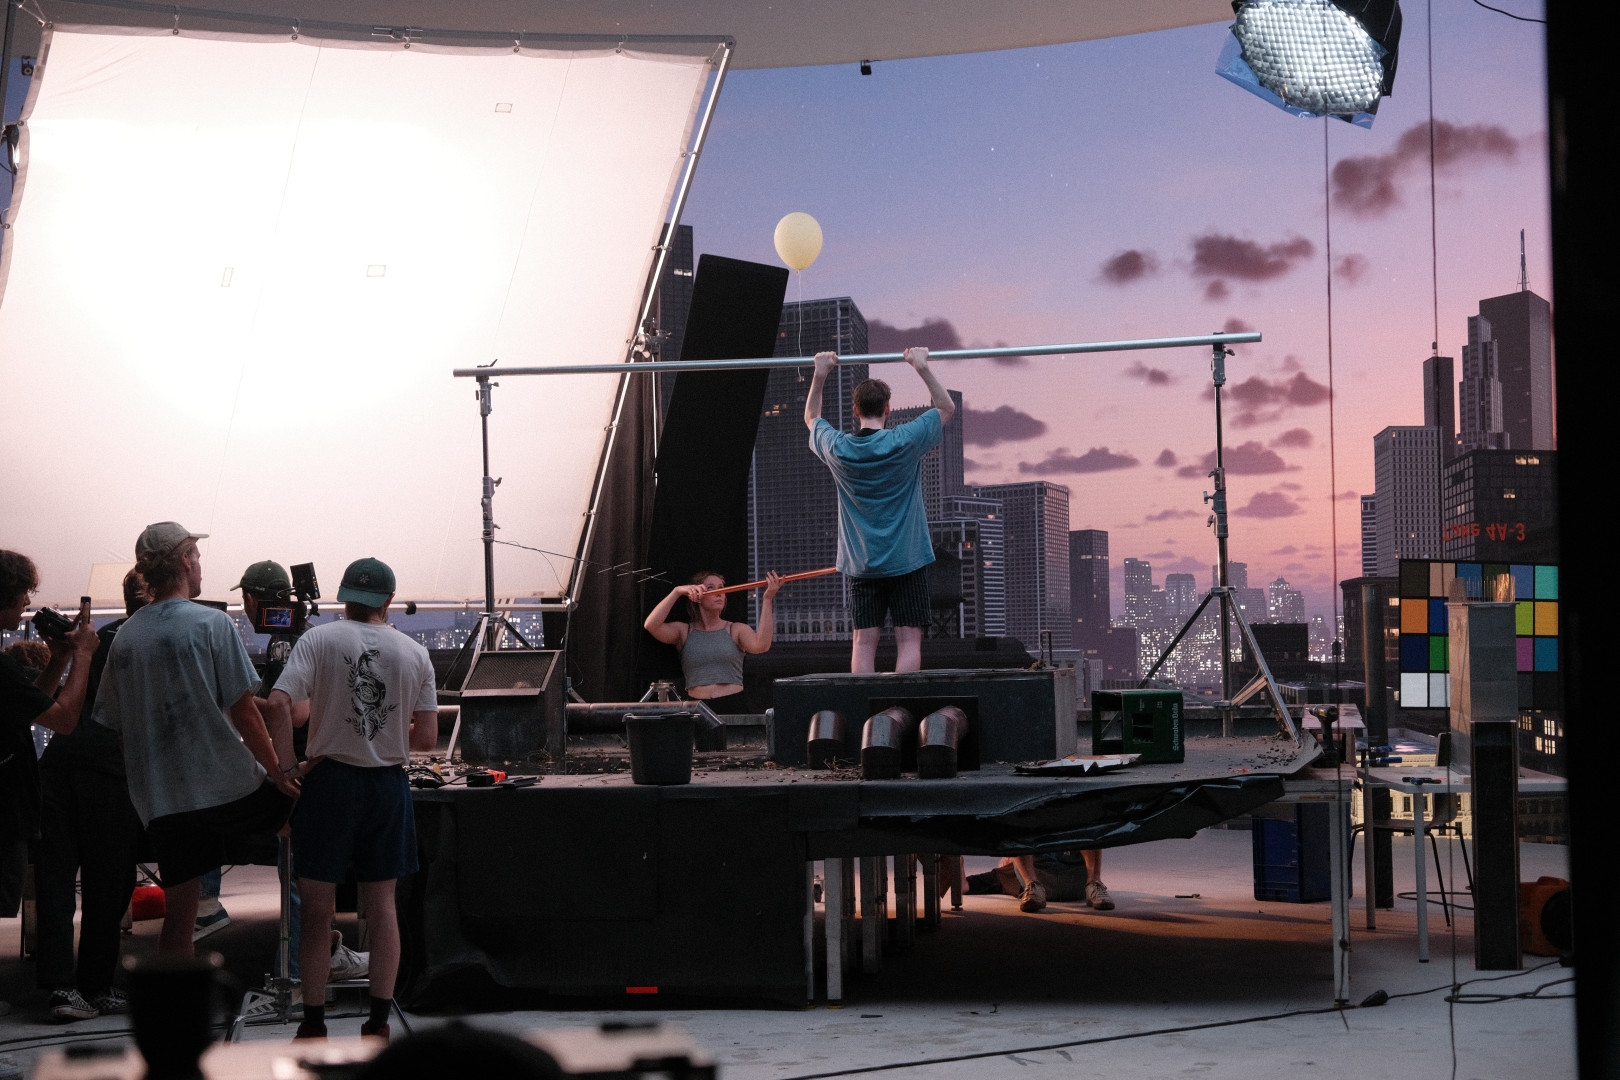
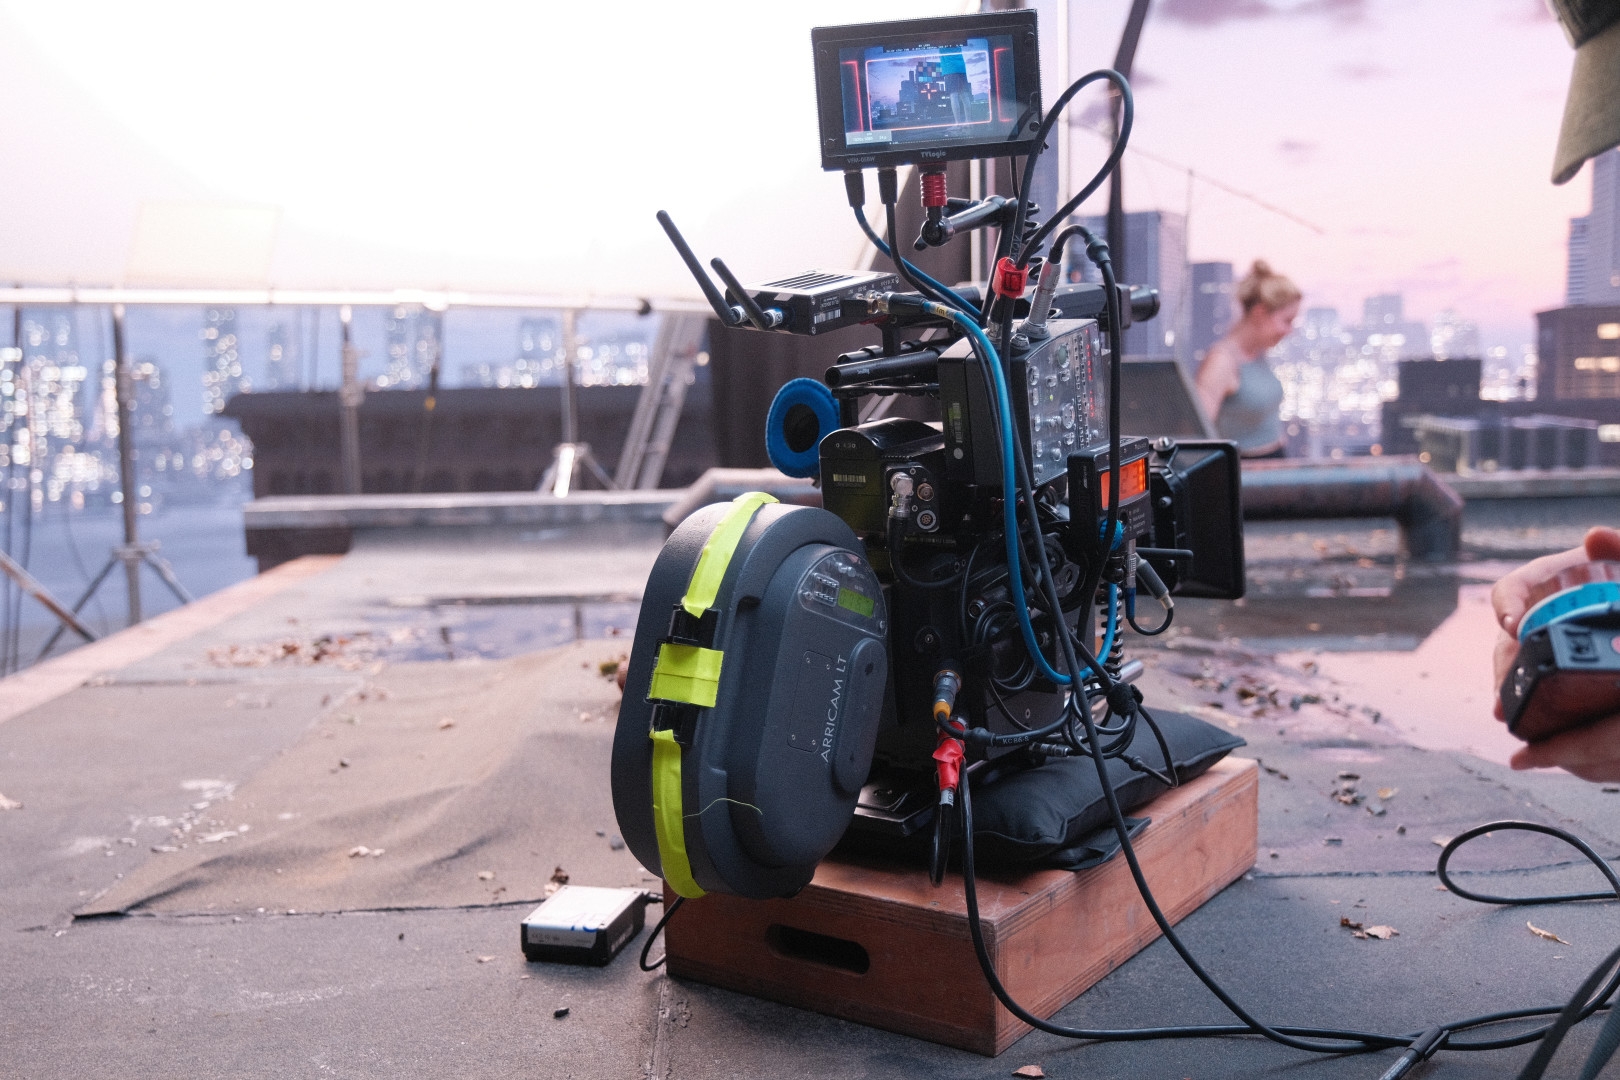
Luis Zappe: In order to identify the differences between shooting on film and digital cameras in the volume, we shot on Kodak Vision3 250d and an ARRICAM ST as well as on an ARRI Amira in the Hyperbowl near Munich. ROE DIAMONDS LED panels were used in the volume. There were two preparation days and one shooting day in the Hyperbowl, as well as one shooting day on location.
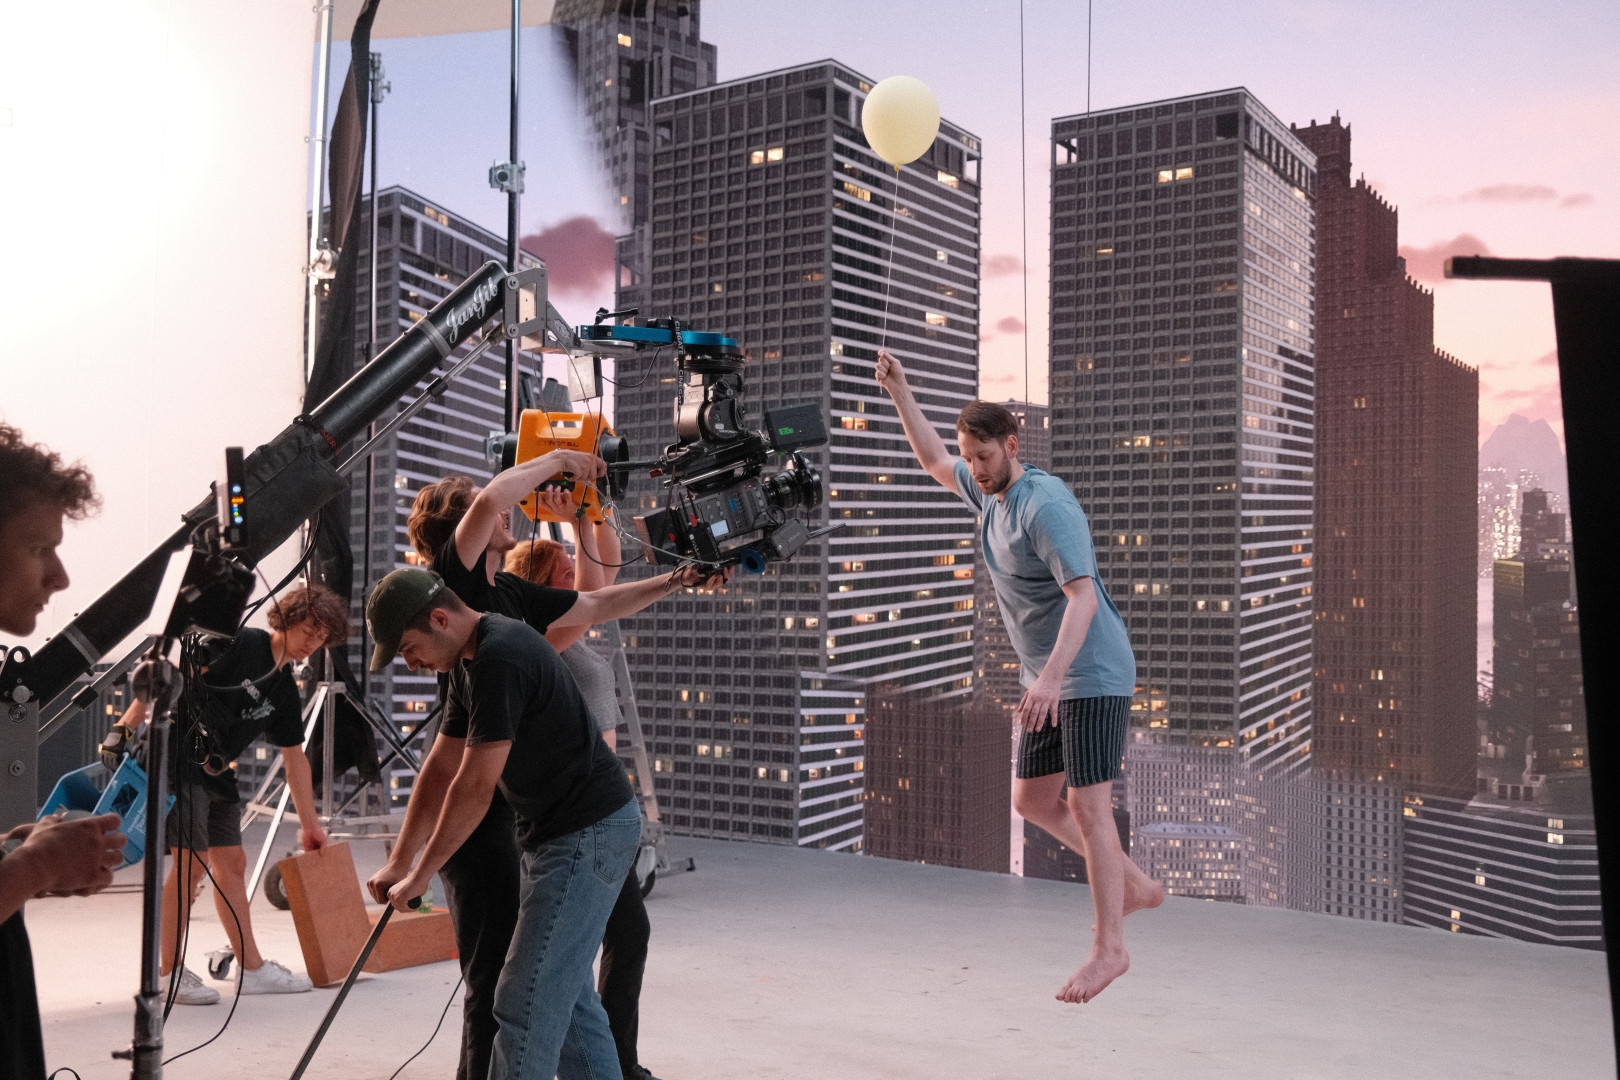
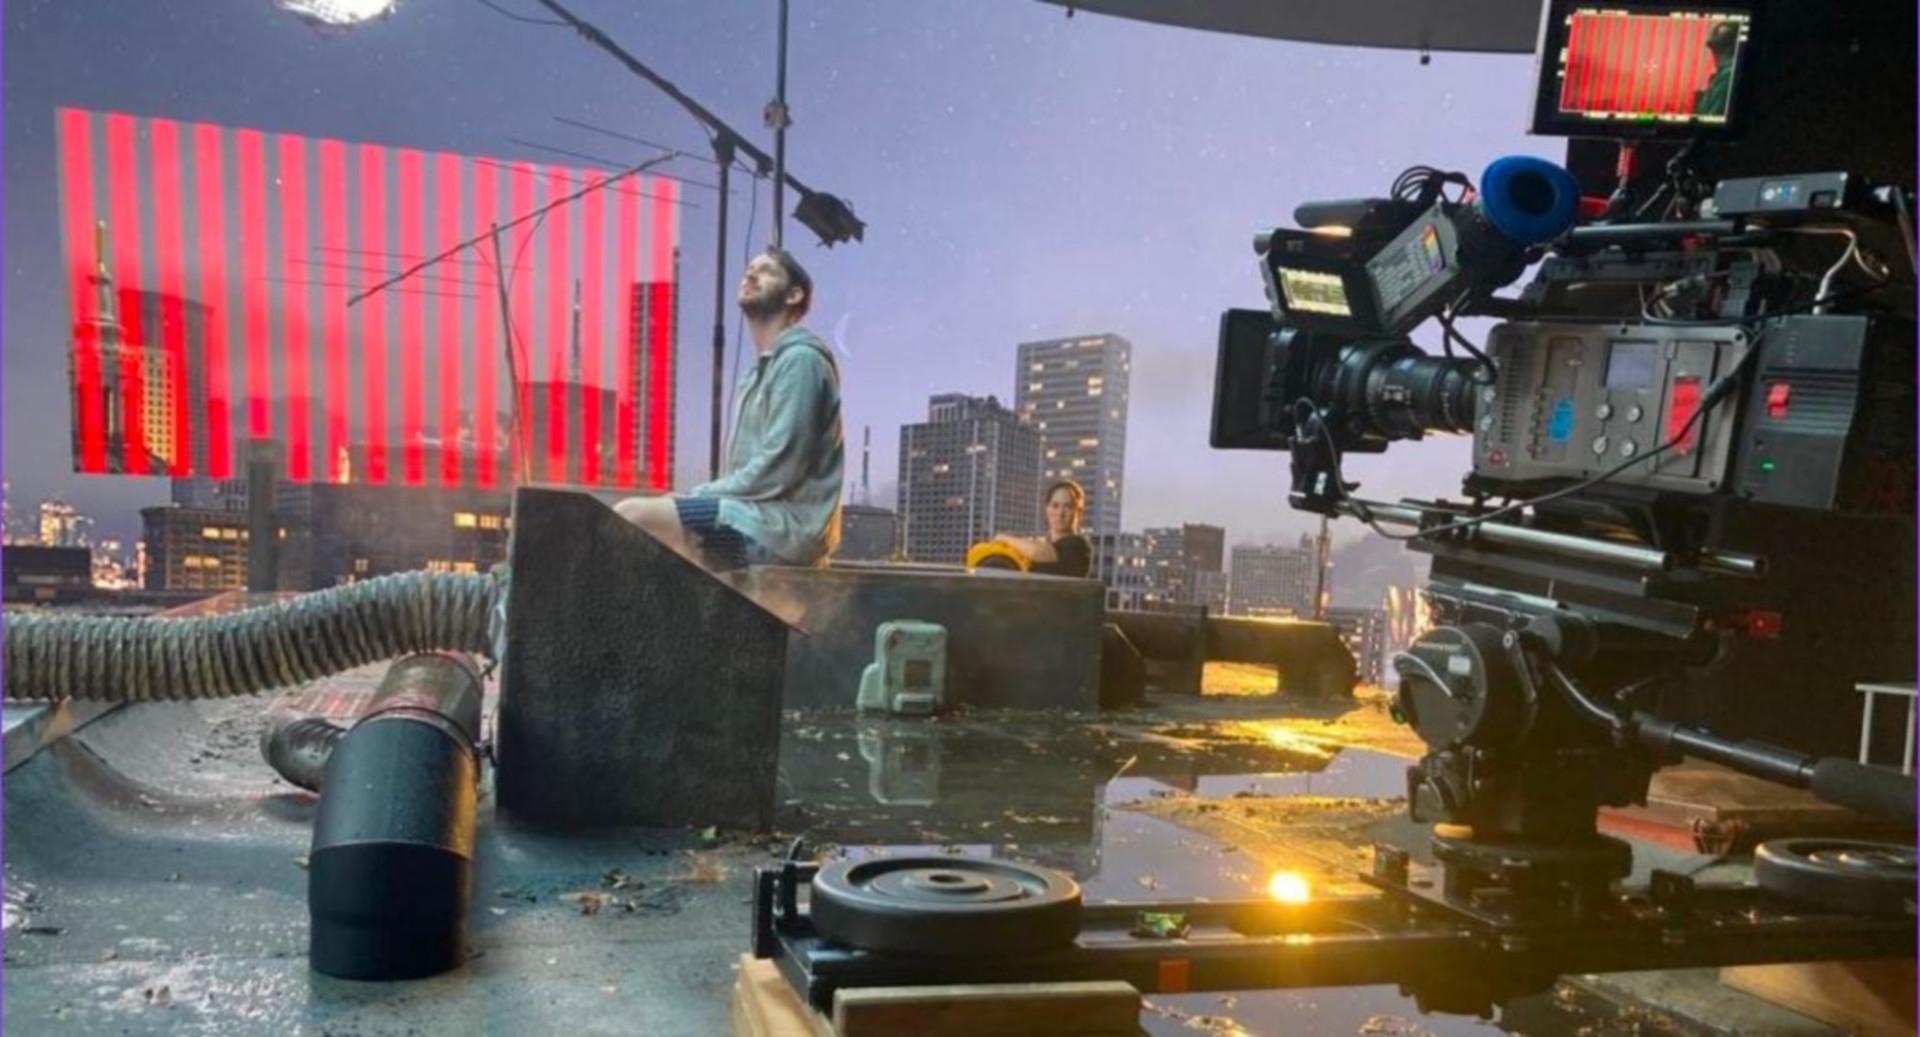
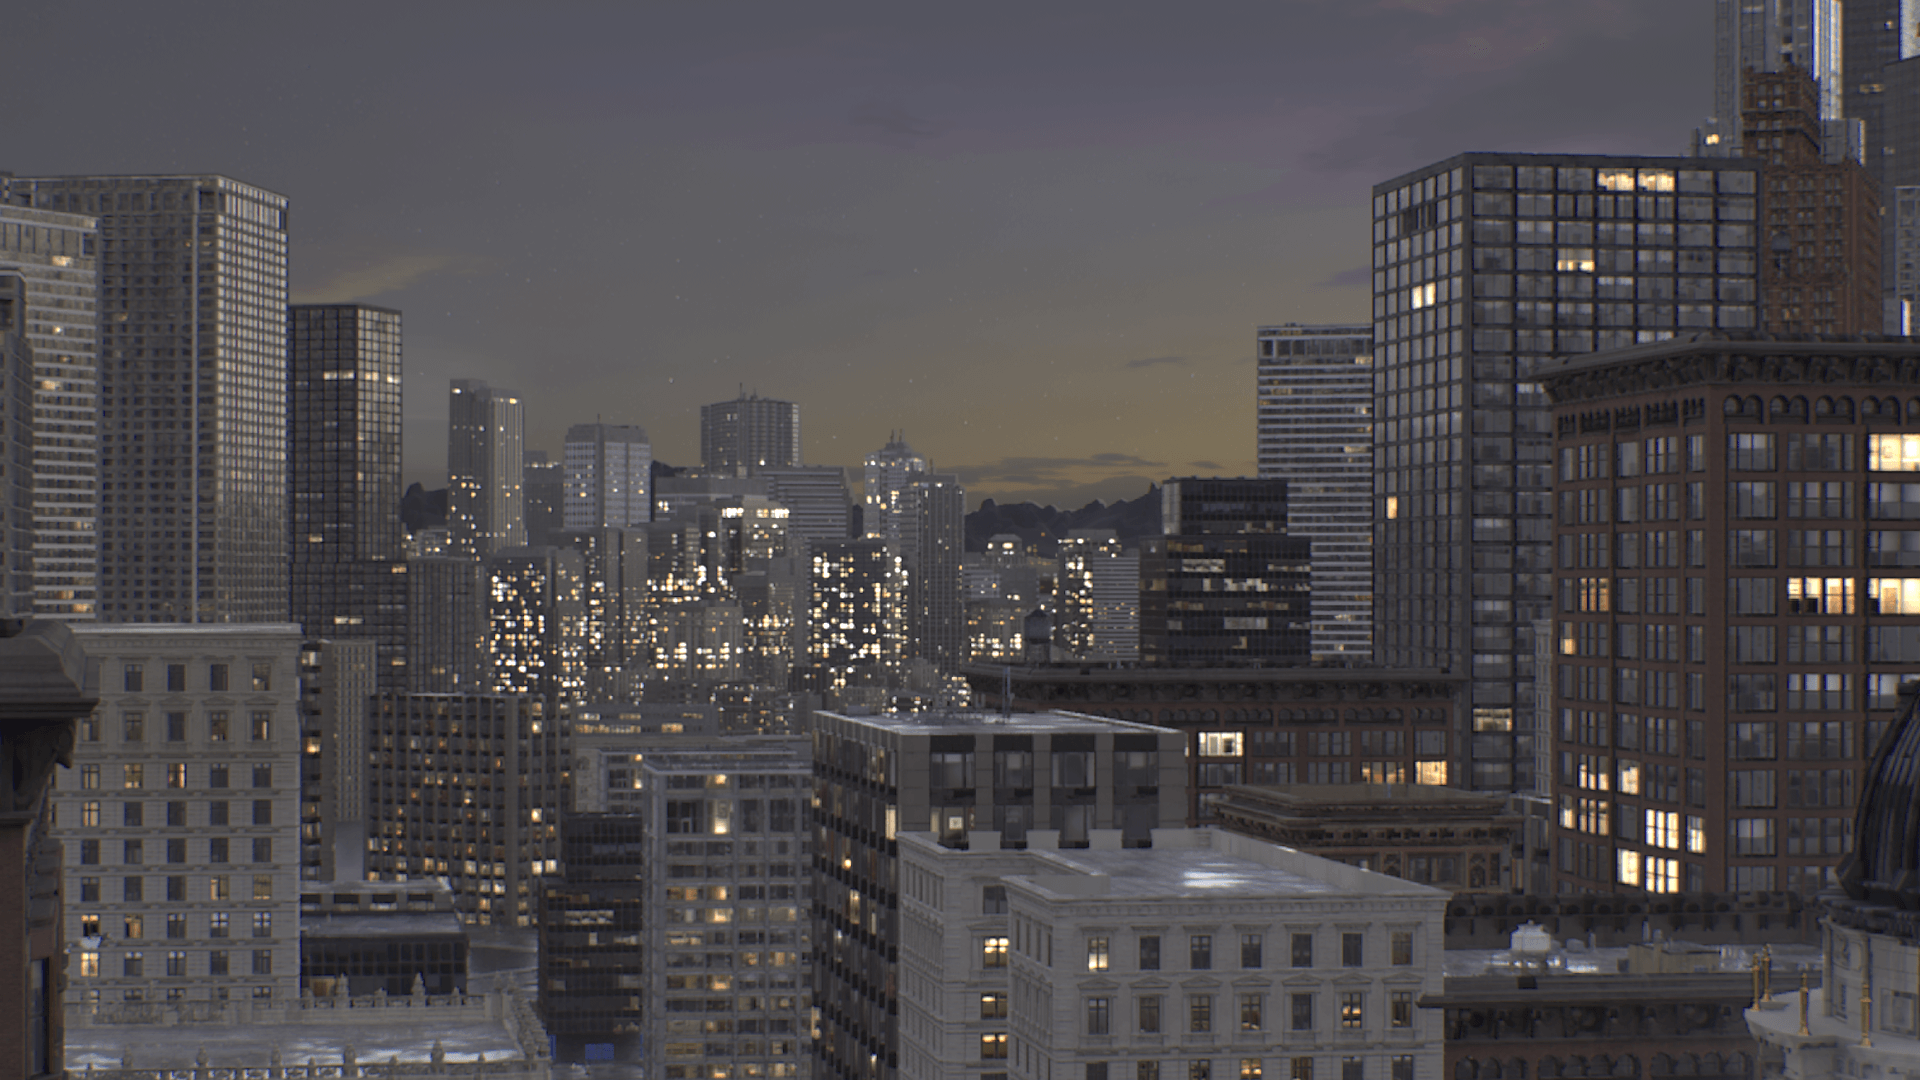
During the test days, technical hurdles were discussed and workflows tested in order to integrate the analogue camera into the otherwise digital production environment. We also prepared the unreal environment and carried out measurements for correct colour calibration to enable precise comparability of the material. The shooting schedule had to be created in such a way that each shot could be shot in both digital and analogue. The technical conception of the process took the most preparation time. The strength of the volume is the extension of a physical set in the foreground, for which the art department built a credible metropolitan rooftop in the Hyperbowl in a short preparation time.
DP: If we start with the obvious: What were the first hurdles?
Sebastian Burk: From the previous shoots in virtual production environments, we actually already knew that we would face hurdles, we shot in July last year and, as far as we know, nobody had done this before. It’s not obvious at first. The first hurdle was that we had hardly any previous experience of shooting on film. We all actually grew into filmmaking purely digitally. From the digital virtual production productions, we were aware of how precisely the sensor and the LED wall had to be synchronised to avoid double image artefacts or scanline artefacts. In addition, the colour pre-distortion of the wall for the sensor used is an important basic building block for credible ICVFX. But how do you synchronise the analogue shutter to the LED processors and how do you match the wall to the film stock? There was basically nobody who said: This is exactly how it has to be done. Instead, there were a few theories and hypotheses in the room. So we had to find out a lot ourselves. I think those were the fundamental challenges. We had to carry out a few tests for this.
DP: And which film stocks did you consider?
Luis Zappe: We decided relatively quickly in favour of Kodak Vision3 250d, as it is an industry standard for shooting with film and is also balanced relatively close to the white point of the wall. A more light-sensitive tungsten film stock would have been conceivable, but would have made it necessary to adjust the playout of the LED wall. Leaving the white point of the wall at 6500 K, and therefore the colour of the sky of our Unreal scene neutral, made it easier to judge the scene by eye and counteracted the glow of daylight LED lamps.
DP: Can you select film stocks without monitoring? And how does this translate into colour spaces and “language” in today’s pipelines?
Sebastian Burk: LED panels already represent a large colour space these days. The ROE diamonds of the Hyperbowl were able to reproduce a fairly large gamut (DCI-P3). Nevertheless, this is a display-referred colour space. The gamut and the dynamic range do not represent the naturally occurring light situation by far. It could therefore be assumed that it would be unproblematic from the recording side to reproduce the colours of the wall in the film. Digital cameras have only come close to the colour space and dynamic range of the film stock in modern developments. In the latest HBO Camera Assessment Series SEASON 6 (is.gd/hbo_camera_q_and_a), Suny Behar comes to the conclusion that analogue film stock is no longer the benchmark, especially in terms of dynamic range. So we thought we were on the safe side. The only challenge was to ensure that the colours ended up where they were intended after the chemical development process. In the digital world, exact colour space transformations can be determined mathematically, but this is not possible with film. So Luis had creative freedom in his choice of film, and the colour calibration of the wall can be adapted accordingly.
DP: How can you calibrate the colours to each other?
Sebastian: In order to translate the film stock into the “language” of today’s pipelines, we took test shots of the primary colours of the LED wall on Kodak Vision3 together with the Hyperbowl. At the same time, we measured these photometrically. After the development process and the scan at silver salt using a Cintel scanner, we were able to use the scans to calculate the corresponding correction matrix for pre-distortion of the wall.
We were then able to implement this in Unreal using an OCIO configuration. The challenge here was that it was not entirely clear to us which colour transformations were carried out in the Cintel Scan, so we were surprised by the small gamut that could be determined from the x,y coordinates of the primary valences of the images from the scans. In fact, this would have required even more testing time, so we decided to use the same correction matrix for the Amira and the film stock, which we calculated manually in the same way. In the end, that also worked.
DP: How clear was it that it would happen in the Hyperbowl? What kind of preparations and measurements were there?
Luis Zappe: It was important to know what sync signals were used in the Hyperbowl so that we could choose cameras that were compatible with them. The FPS of the LED wall was also important to avoid any problems when designing the shots. Super slow motion with more than 100 fps would not have been possible, for example, as the wall cannot play out more than 100 frames per second. The white point of the LED wall influenced the choice of film stock.
DP: If you were to shoot the same thing on a different stage, what would be the “key figures” that are important?
Sebastian Burk: I think it would also be possible in other stages if the operators and the production team are prepared to adapt to the changed workflows. Additional tests have to be scheduled and such a production cannot be run according to standard digital schemes. A sync signal must also be available that is compatible with the selected analogue cameras. Special software solutions for synchronisation are less helpful here, as they are designed for purely digital components. In our experience, however, it is not relevant how the synchronisation is played out on the wall. So whether directly from Unreal or with Assimilate LiveFx or similar solutions. Everything that requires a playback of the camera image is logically difficult – keyword inside out tracking based on the camera image.
Luis Zappe: The volume must of course also provide sufficient nits so that the film stock can be exposed correctly. The 1500 nits of the Hyperbowl were more than sufficient, especially as we were shooting in a night-time environment. So the maximum light intensity of the volume was not utilised and fewer nits would have sufficed.
DP: And how did the shoot go?
Luis Zappe: The day of filming in the Hyperbowl went well, but not without hurdles. Each shot was first lit with the Arri Amira as a viewfinder at ISO 200, set up and shot for comparability. We then switched to film and repeated the same shot without changing the light until the result was creatively satisfactory. The biggest hurdle was the sheer amount of technical components that had to be handled. 2 cameras, synchronised differently, the stereo camera for the AI background separation tests, as well as the recording of the inner frustration and of course the VP environment itself, which always involves more effort than expected. It was also extremely hot on the day of filming.
DP: Balancing that and keeping it synchronised was…
Luis Zappe: The ARRICam ST can receive sync signals via the External Speedbox, but only SD signals, while the other components in the VP studio work with HD sync signals. With the help of two separate sync signals, SD and HD, the camera and LED wall can be operated in the same cycle, but initially not in the same phase.
Exact synchronisation between the wall and camera can only be achieved by manually adjusting the phase of the shutter and must be assessed visually using the viewfinder. Double images that are visible in the viewfinder are not recorded on the film material, as the viewfinder projects the image while the shutter obscures the film. This means that visible double images through the viewfinder = error-free synchronisation. However, it proved very difficult to judge such double images in the flickering image of the viewfinder. We held a smartphone camera with 120 fps recording capability up to the viewfinder and filmed the image so that we could stop the mobile phone video and assess the sync errors in the still image. As the film stock has more dynamic range in the light than in the dark, we always overexposed the film by 50 ISO according to the light meter in order to have more buffer in the depths.
DP: And in post?
Sebastian Burk: We scanned in preparation at SILBERSALZ with a Cintel Scan and in post-production at Studio L’Equipe with an ARRISCAN. We received the scans from Studio L’Equipe in several encodings in the DPX container. Both ADX16 encoded and logC encoded DPX files. They also provided us with a film emulsion LUT for the material. This then formed the basis for our ACES workflow in post-production, with grading done in Davinci Resolve by Alex Birzele. For the necessary post-VFX, we then used linear EXRs in the ACEScg colour space as an exchange format for compositing in Foundry’s Nuke. The film emulsion and initial grading design were implemented as a viewing LUT in Nuke. The colour management pipeline was built in such a way that the newly rendered files from Unreal Engine for changed backgrounds in compositing were also displayed correctly again by the FilmLUT.
DP: And what did you do about the moiré?
Luis Zappe: Even after the test days, we noticed that moiré artefacts could not be ruled out even with film. The theory that film, due to its irregular grain structure, in contrast to the grid-like sensors of a digital camera, does not form moiré, as no two grids interfere when filming the LED wall, has not been confirmed in this way. Although no moiré artefacts occur in the negative if only the wall is filmed, moiré can occur as soon as the negative is scanned and translated into the digital world. This is simply due to the nature of digital images, which are divided into concrete pixels in a grid. If these interfere with the grid of the filmed LED wall, moiré will occur, even if the film was originally shot in analogue. Whether moiré is ultimately visible in the scans depends on whether the grid of the wall is “visible” to the scanner in the negative and is influenced by the film stock, optics, aperture, focal length, focus point, camera angle and position. On the scanner side, the technology of the scanner and its resolution determine whether its screen interferes with that captured in the negative. It is therefore difficult to predict whether and how moiré artefacts will appear in the scanned footage.
Moiré cannot be completely prevented by film if the entire post and delivery are not analogue. However, film can still be advantageous for moiré, as the negative is an additional intermediate step between the scene and the digital image of it, compared to digital cameras. This intermediate step has a soft-focus effect that tends to blur the grid of the LED wall. In addition, moiré artefacts are not baked into the image after shooting and can possibly be avoided in post by scanning in different resolutions.
DP: And the colours?
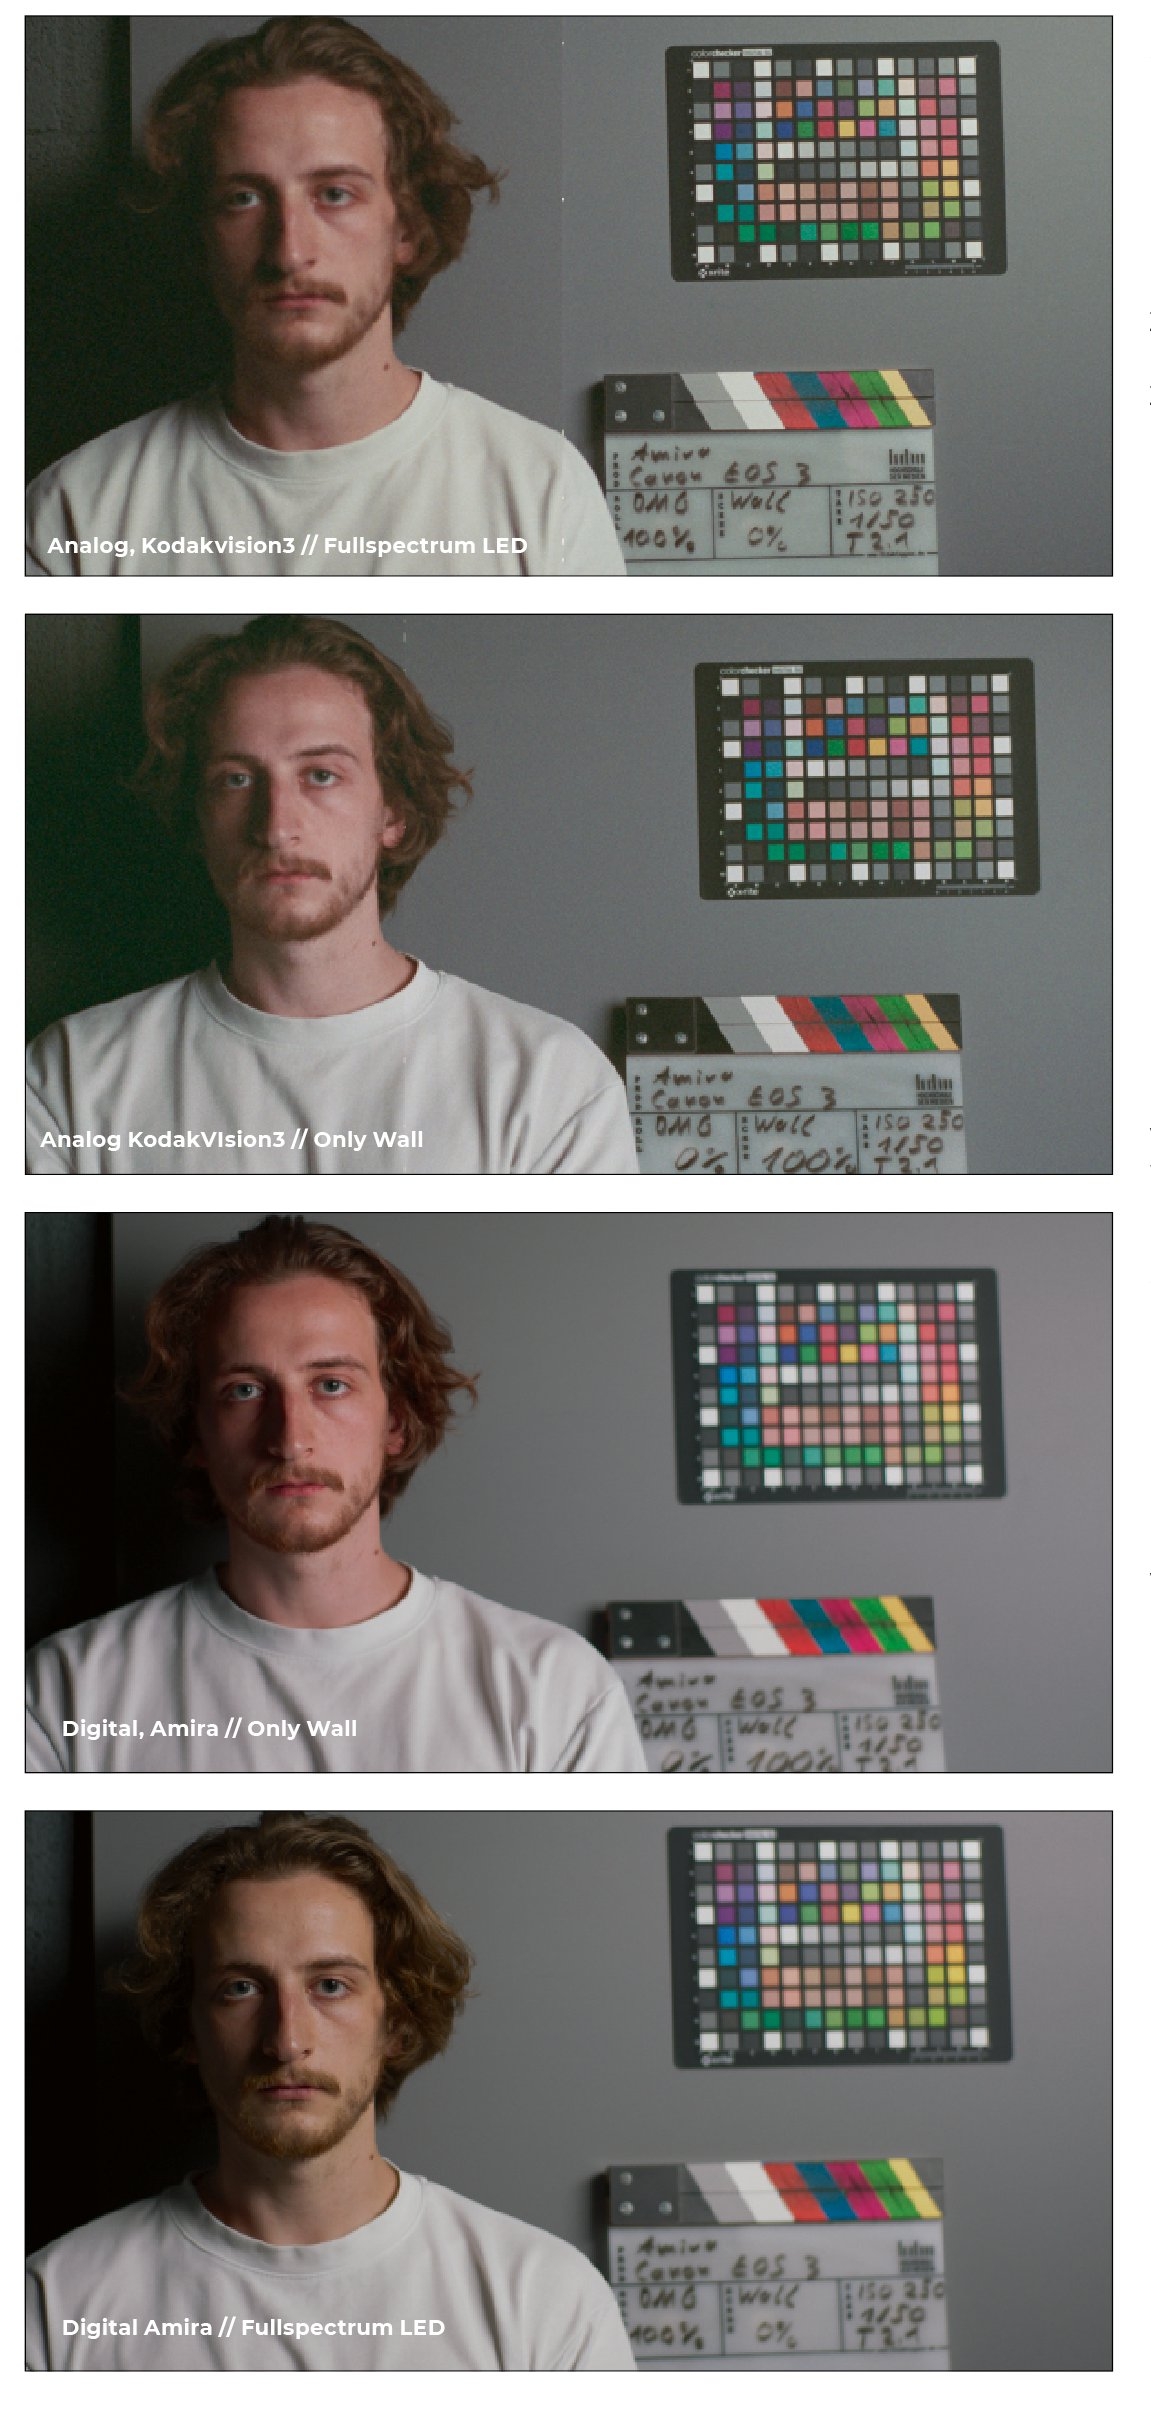
Luis Zappe: In terms of colour, the scanned material showed great strengths. We sent the material to Florian “Utsi” Martin (Senior Colourist at ARRI) and Steffen Paul (Senior Colourist at BasisBerlin) for a detailed expert opinion. Both agreed that the skin tones on the ARRI Amira quickly tipped into red without additional film light, while the skin tones in the scans were almost completely stable despite the narrow-band RGB light situation in the volume and required no further correction after white balancing. The scanned footage also looked good in the colour checker and the rest of the scene. The film generally seemed to handle the narrowband spectra better and was less prone to metameric errors.
DP: Wait a minute, Nuke? What did you have to comp?
Sebastian Burk: The big goal of ICVFX-VP is to capture the final visual effects in-camera. But productions that have already used VP will, I think, have experienced that not everything always fits and not everything worked perfectly on set. Various factors play a role here. It can start with inadequate preparation. Because where the post-VFX is usually finalised with many iterations after the shoot, here it has to be right on set and the scene has to offer flexibility, performance and realism. This is a major change to the usual work processes for post, and yet this is the great advantage of VP and ICFVX: on set, creatives can decide whether they want the houses to be there or there, for example, according to the requirements for the image design. This gives control back to the set. Many decisions can be customised if the virtual scene allows it, but sometimes this is not possible as desired, so post-production is necessary.
Luis Zappe: Having the freedom to customise the background on set was very convenient and gave us a lot of creative freedom. In post-production, however, we still realised that we needed to tackle one or two things again to make the whole scene more coherent and believable. Ideally, we would have had more preparation time to build the Unreal scene exactly as we imagined it and to test exactly whether it works for the individual shots. Then such adjustments to the Unreal scene could have been made even more precisely on the preparation days, and further VFX would probably not have been necessary.
Sebastian Burk: Then there are the technical errors that can occur when using LED walls with cameras. To name a few: If the LED wall is driven too dark because that is what is creatively desired, scanlines can occur. If the depth of field is too high, moiré can occur, as Luis has already described, but viewing angle-dependent colour shifts are also a recurring challenge in grading. Time and again, the contrast between the LED wall and the foreground is not harmonised and the image falls apart visually. Once the image has been rotated and you want to change something again for whatever reason, the background has to be separated from the foreground again in post. However, the errors usually only relate to the LED background and not to the “real” background.
DP: How would you do it “normally”, and what exactly did you do this time?
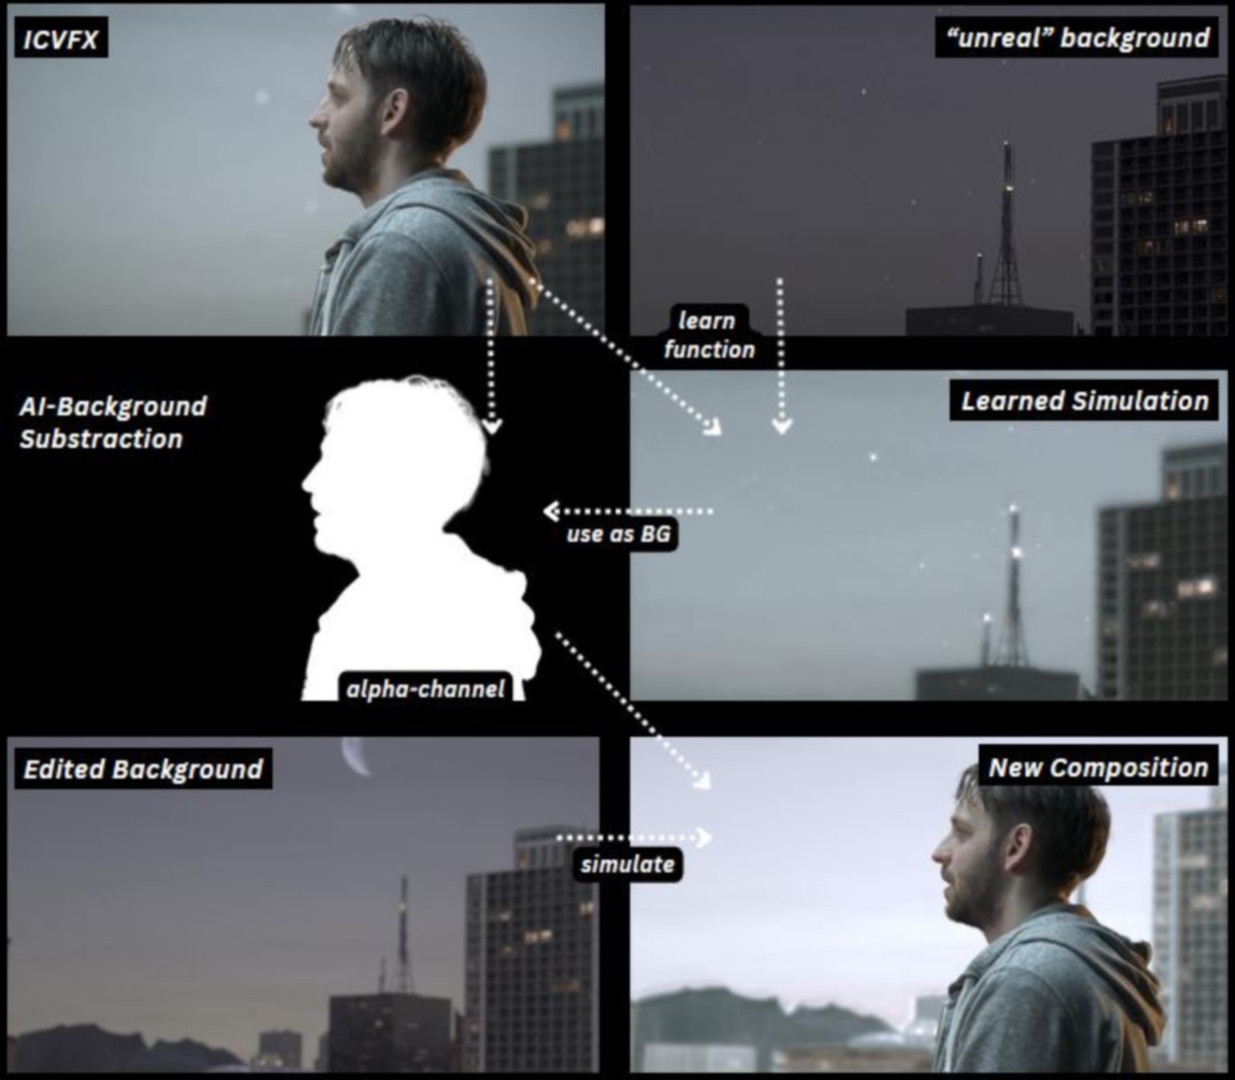
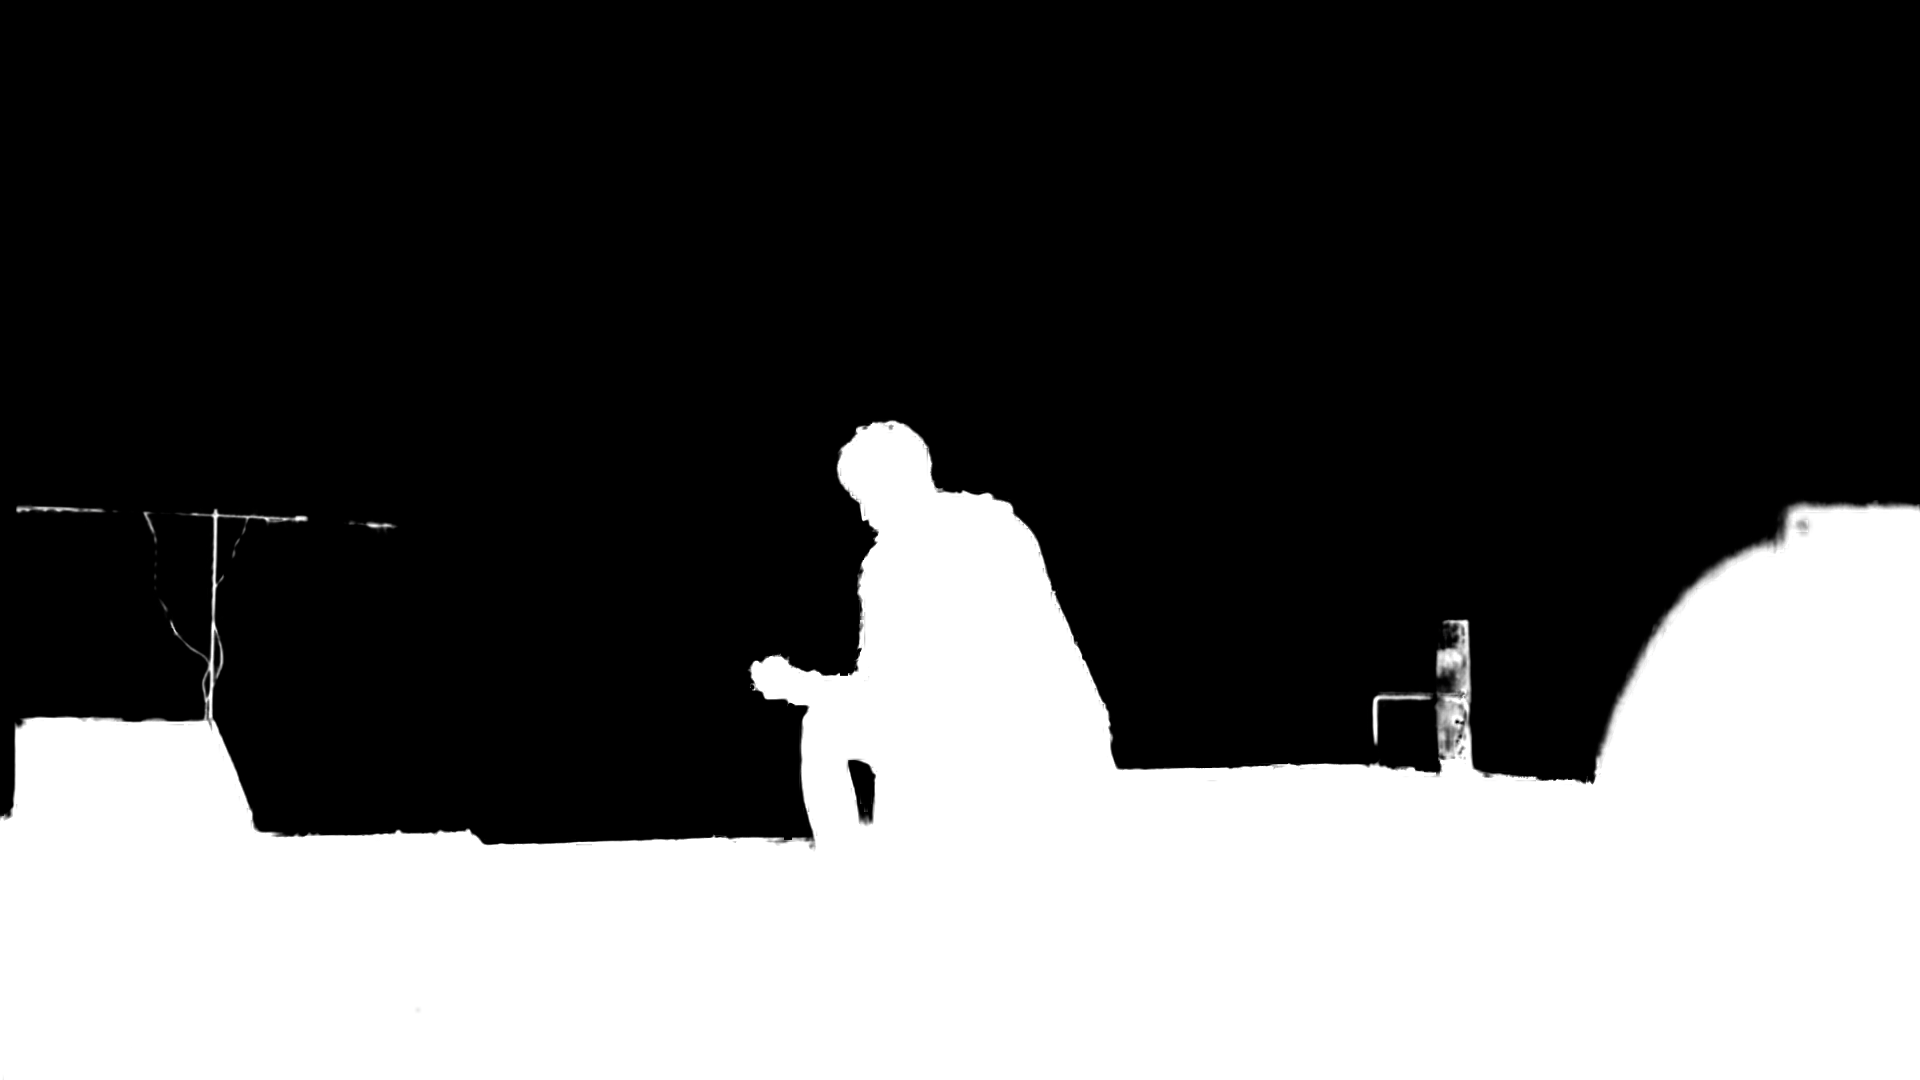
Sebastian Burk: This separation of foreground and background often has to be done by rotoscoping, because with ICVFX there is no longer a keying channel and so the alpha channel cannot be easily determined algorithmically. And this was an attempt to find out how it could be done more simply and automatically. And this is where AI can play an important role. There are already very good separation and motif recognition systems. Also implemented in established DCC software. That’s no secret. However, the approach here was to try to concentrate on the LED part of the background and to separate it as if we had used a green screen, for example. We then tested various things, e.g. infrared analysis of the scene, spectral containment of the light from the wall, depth estimation with a stereo camera, and then came to the conclusion that the simulation method was the most promising.
DP: What tools did you use to “simulate” the background, and why exactly?
Sebastian Burk: Nuke has offered a machine learning framework since version 13 – CopyCat provides a network infrastructure so that artists can solve their own problems with the help of machine learning (see DP 21:04). In this case, CopyCat was used to learn the transfer function using pairs of recorded Frustum and camera image data. The model then maps the theoretical path of the light from Unreal via the LED wall, the optics, the sensor and the other internal camera processing steps.
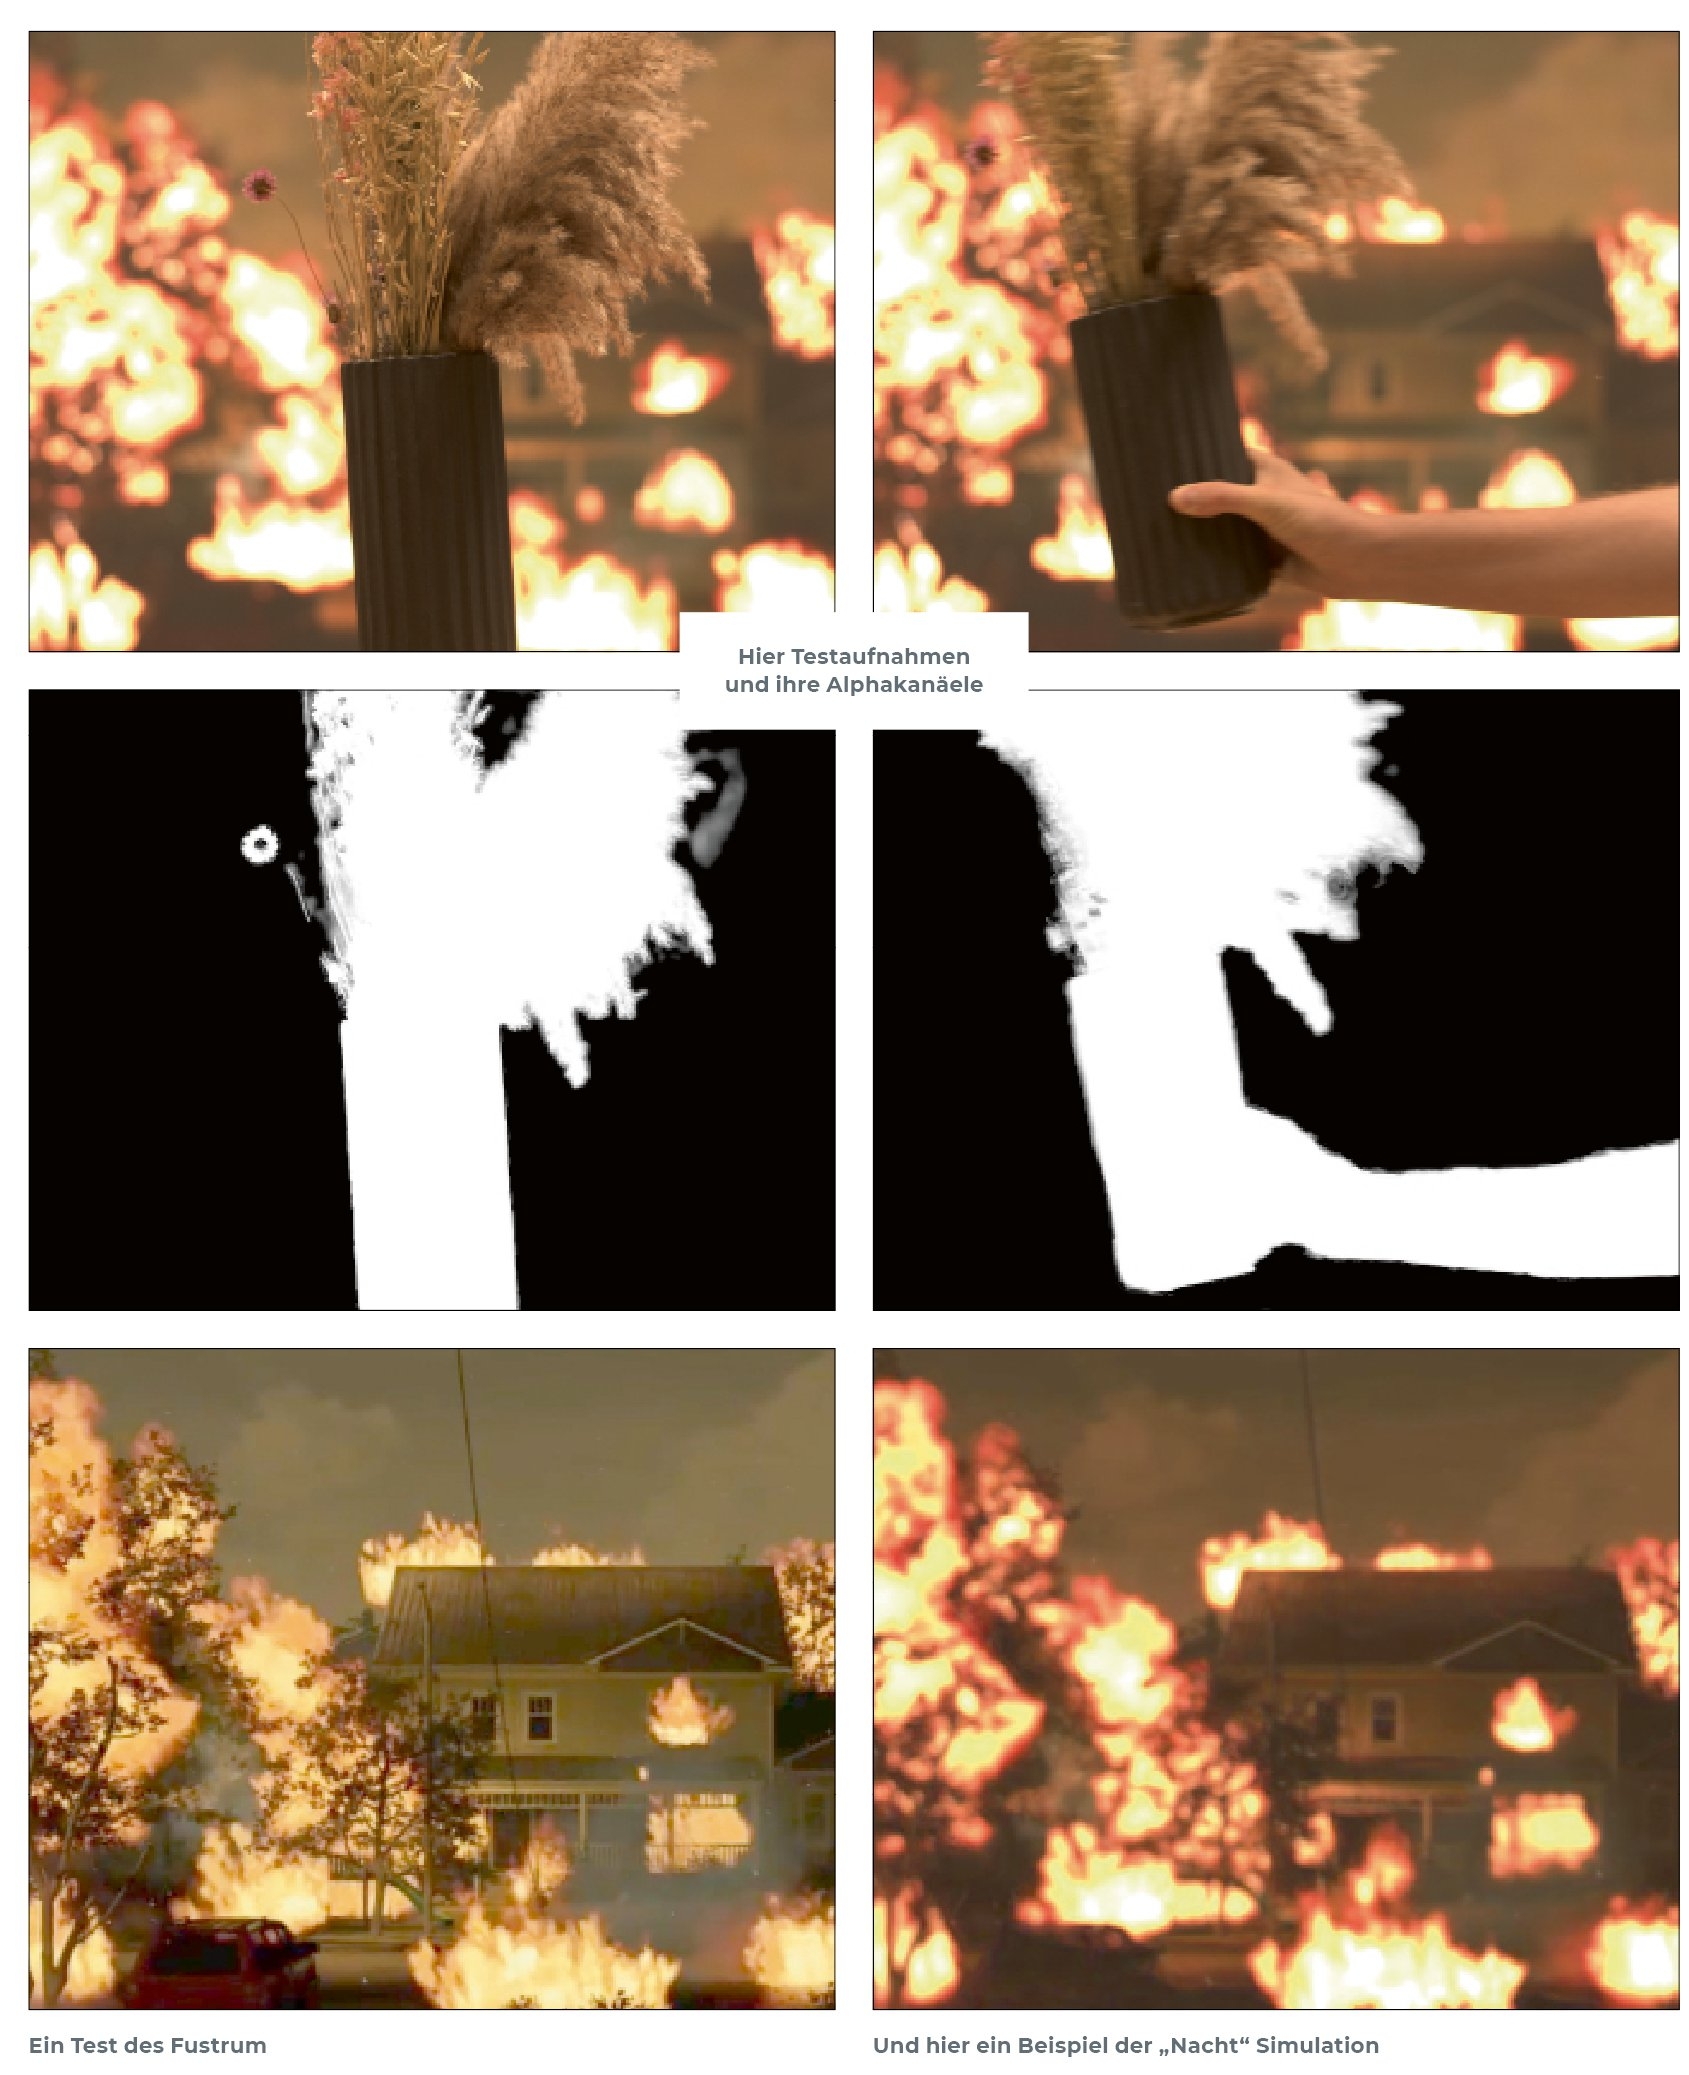
Machine learning is very well suited to this, in contrast to the computational determination of this function. The good thing is that CopyCat also offers pre-implemented models from current scientific papers. These include this implementation of the background matting model(for more information, see: Sengupta, S., Jayaram, V., Curless, B., Seitz, S. M., & Kemelmacher-Shlizerman, I. (2020): Background matting: The world is your green screen. In Proceedings of the IEEE/CVF Conference on Computer Vision and Pattern Recognition;pp. 2291-2300) This method was designed for real-time background matting and therefore offered the necessary requirements. The background for this model was then the simulated frustrum. And that was enough to generate a solid alpha channel for single images. The advantage of this two-stage approach is that when the background is re-rendered in Unreal, the simulation already provides a good starting point for compositing.
Unfortunately, the method is currently not yet stable in moving images and has problems in some image regions, which is why the alpha channel for further images could then be learnt again using the corrected alpha channel for individual images. This means that learning is currently still quite complex. Of course, you can ask yourself whether it would not have been better to rotoscope and yes, that would certainly have been easier for the project now, but the long-term goal of this approach would be an automated alpha channel for ICFVX.
DP: Okay, in summary, does that mean…?
Sebastian Burk: The method is actually the same for digital and analogue, as the model doesn’t care how the image is ultimately created in the camera. The aim is to learn how the rendered frustration changes through the ICVFX process. And the background matting is then created from this. The advantage of the simulation is that desirable image artefacts such as grain are also transferred to the purely digital frustum. The better the model, the better the image effect. In our workflow, however, we classically degrained before the simulation “learnt” and added the grain afterwards.
DP: Letting “B-Cam” roll along and running it to train image generators actually sounds clever – how much data was necessary for a solid result?
Sebastian Burk: In principle, not much additional data is required. The Frustum is rendered by the cluster in the Virtual Production Stage. This must be tapped at a suitable point. External recorders of the signal or software solutions such as OBS on the nodes, where the nDisplay instance renders the inner frustum, are suitable for this. There were always software complications during filming that had to be fixed quickly. In order to synchronise the Frustum with the footage again after filming, we inserted a virtual clapperboard with which the two shots could be synchronised. Unfortunately, there were always incorrect recordings of the frustration. The approach worked well in test environments, but had its difficulties in a production context. In this production context, the training was very specific. If the model is to be generalised well, large data sets are required. For tests, for example, I only simulated a Zeiss CP-3 50 mm with an aperture of 2.8 and a focus distance of 1.3 m outside of Nuke, and this resulted in a lot of data for training. So it depends on what the goal is.
DP: Do you have any tips on what to bear in mind for this solution?
Sebastian Burk: To try out this solution yourself, you should have enough pairs of Frustum and camera available. In our production, there was sufficient unobstructed view of the LED wall in the shots around the real foreground, so we were able to use the real footage for training. CopyCat was fed with pairs of extracts from the footage and the frustration. If the real part is more present, rotating the wall separately with similar content would be a good way to train the model. The handling of variable focus and variable aperture is a challenge in the current development. In any case, there is still a lot of room for improvement and it is not really possible to speak of general suitability for production. Nevertheless, I think that this approach can have advantages over manual rotoscoping, current tools in DCC applications or shooting at a high frame rate and hidden keying frames through precise synchronisation. What is suitable depends on the specific requirements of a production and the story to be told through images.
DP: And what have you learnt for yourselves?
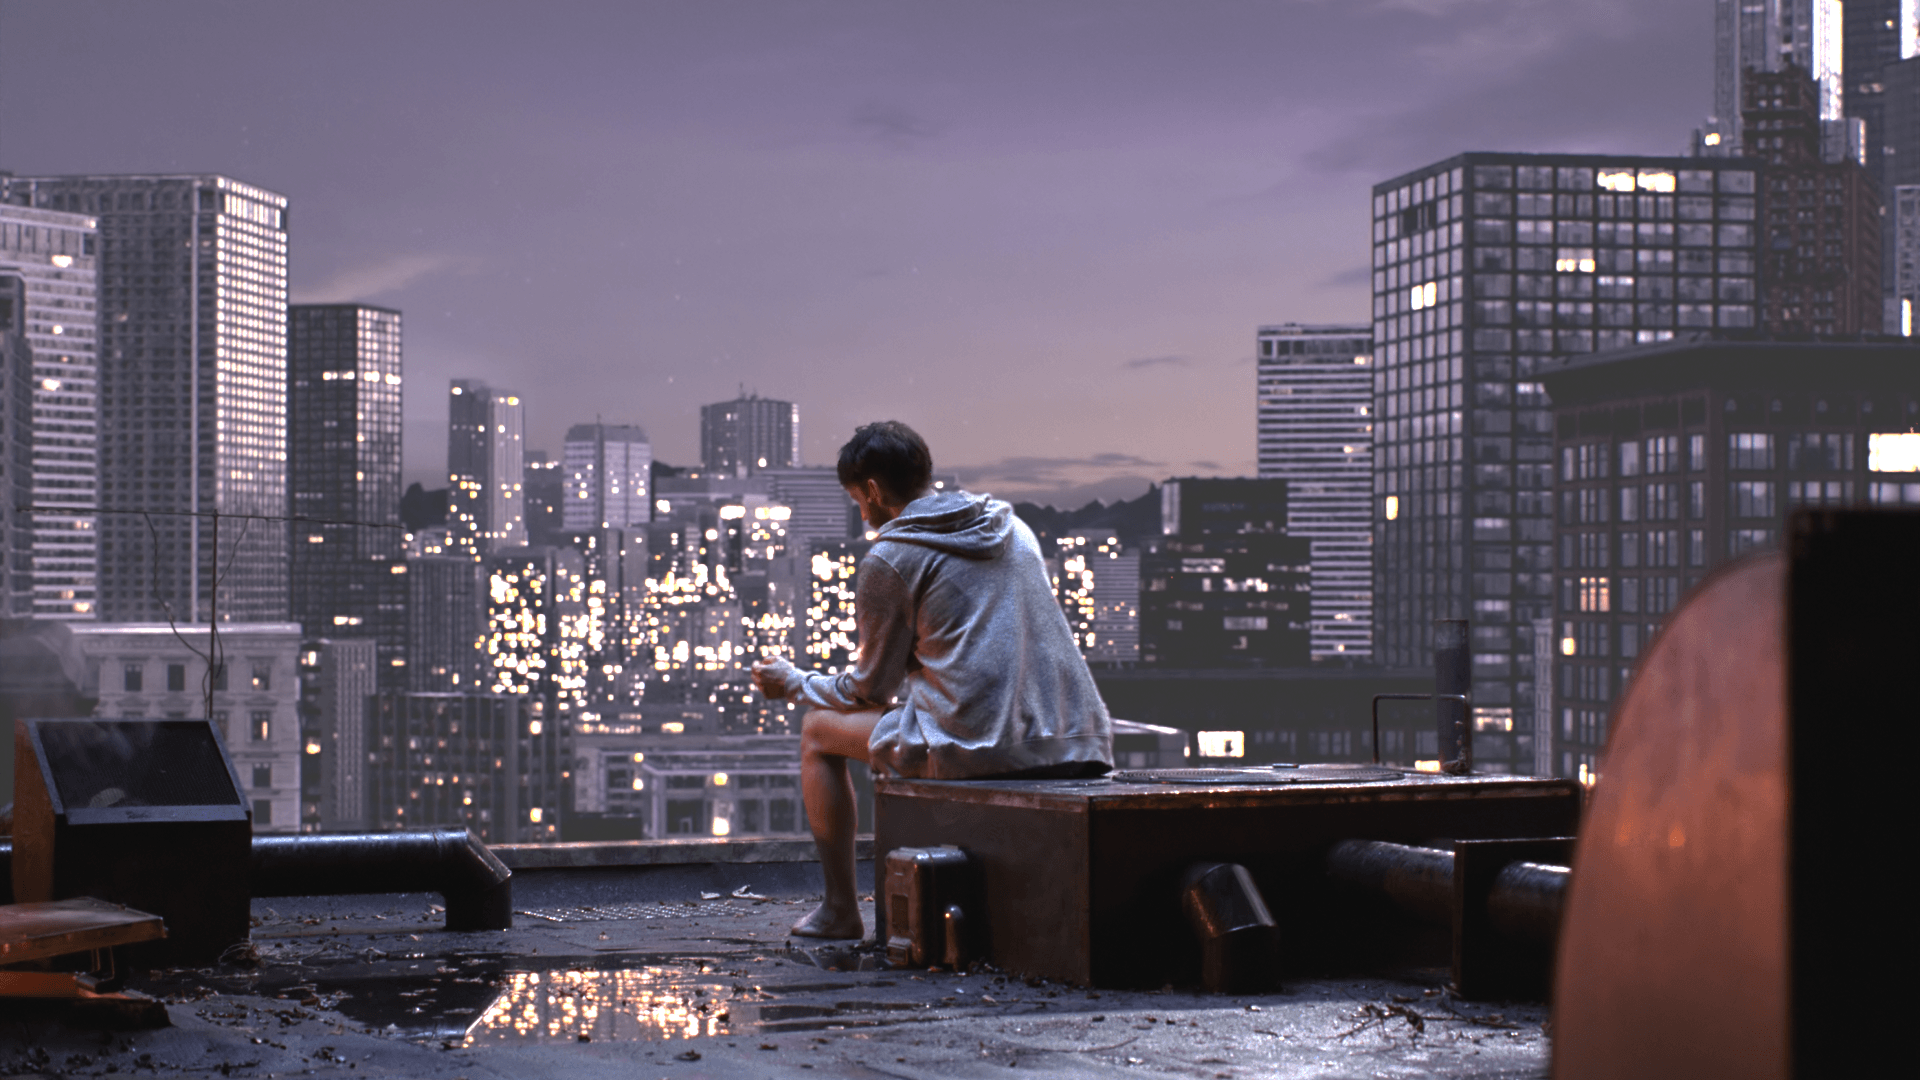
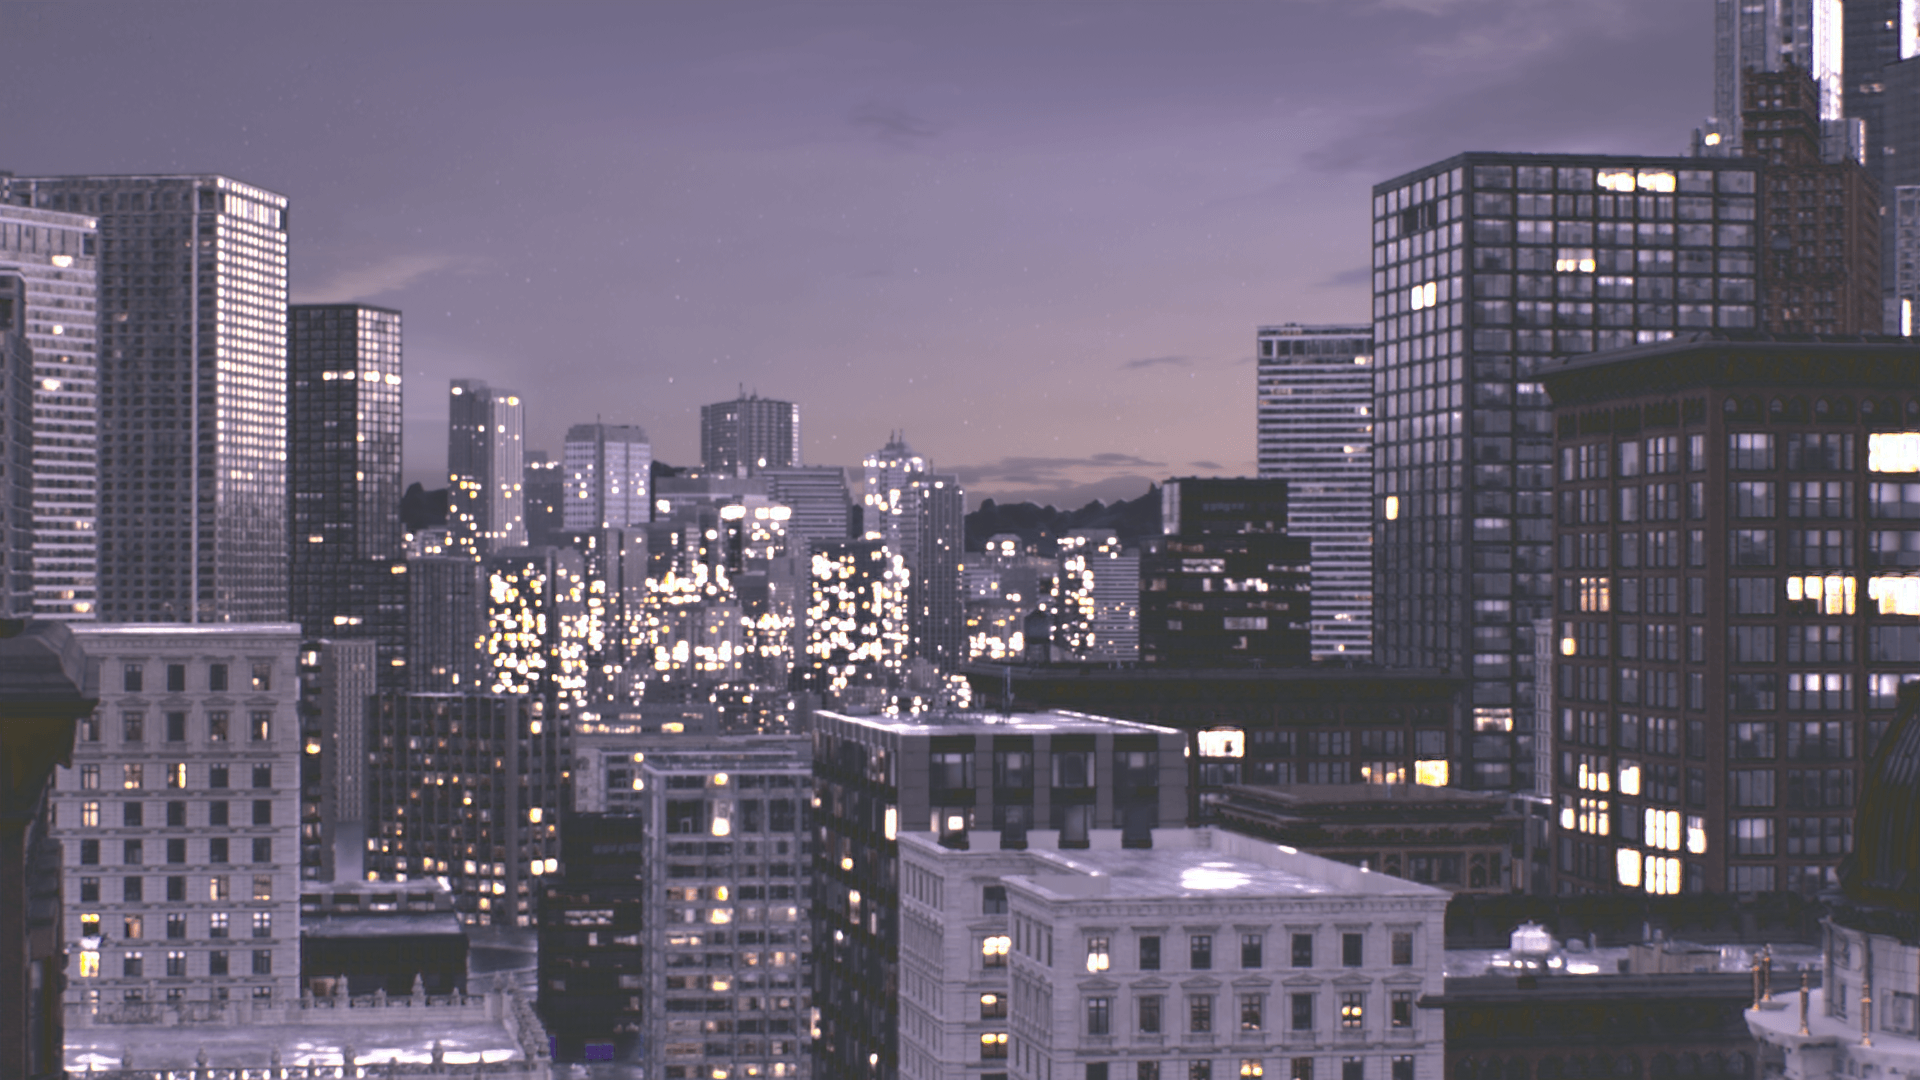
Luis Zappe: The biggest advantage for me was the precise control of the virtual night scene. We were able to adjust the brightness of the sky and the level of detail of the clouds and stars exactly as we wanted and to the ISO of our film stock. Shooting such night scenes on film on location would cause the night sky to fade to black and would usually require a lot of additional light. This is where the volume offers a great advantage and the opportunity to create a look that is not yet known from night scenes on film.
On the other hand, the film handles the narrow-band spectra of the RGB LED walls better and produces natural skin tones with fewer metameric errors than digital cameras. In general, the organic, soft look helped to make the scenes look more realistic and counteracted the “video game look” that scenes shot in volume often have. In the end, we came to the conclusion that the combination of analogue film and LED volumes is not only possible, but can even be advantageous and can expand the application possibilities of both tools.
DP: If you were starting fresh, what dead end would you avoid?
Samuel Ramm: I would definitely put even more time into pre-production and make sure that the Unreal world is ready for the test shoot and that all technical parameters (colour spaces, Unreal Frustum recording etc.) are set so that the test shots can be validated afterwards. Pre-production in VP is of immense importance anyway, but if you are shooting analogue, it is not possible to conclusively assess live how your world will integrate. So pre-production should be even more important.
DP: Are there any areas where you want to experiment further with this workflow?
Sebastian Burk: There is still a lot of potential for development and there is interest in continuing to tinker, the workflows have to be adapted depending on the production, but I think this is very possible. I don’t think you should force analogue in VP, but if you want to combine the tools sensibly, it’s definitely possible. Whether the simulation method can be further developed for production suitability remains a research interest.
DP: How satisfied are you with the result?
Luis Zappe: I am very happy with the result. Not only did we work through the workflow from start to finish and get exciting research results, but I’m also very happy with the resulting advert. Of course, you can always criticise your own work in retrospect, but on the whole I’m happy with the resulting images, especially considering how complex the undertaking was and how inexperienced we were. For me, it was particularly exciting to be able to work with film and the LED volume at all, an opportunity you don’t get every day. The project was a mammoth task with many question marks at the beginning, but these were gradually resolved and everyone learnt a lot. I am extremely grateful to all the people who invested their time and gave us and the project a chance. I think the project was a success.
Sebastian Burk: As a post supervisor, I found it exciting to be confronted with the challenges of a complex post-production of ICFVX. It was also very valuable to have the opportunity to test an idea like the simulation method in a production context! It would have been rounder if ICVFX had worked satisfactorily straight away, but the visual integration of the post adjustments into the ICFVX parts worked really well and I’m glad and grateful that everyone really got stuck in during post-production to enhance the ICVFX material. The fact that the Unreal/VFX artists in particular put so much of their time and energy into it is really great. In general, it was a huge pleasure to work with this team, from pre-production to post-production. And of course I also learnt a lot.
Samuel Ramm: Considering that nobody could tell us beforehand whether what we were planning would work, the project was a complete success. Not only were we able to demonstrate clearly on the technical side that “analogue” works in VP, offers advantages and where there are challenges, but we also produced a commercial that is currently being submitted to various festivals. The fact that we ended up with a finished spot shows that analogue in VP is not only possible in an isolated test environment, but also works on set.
DP: In your personal opinion: Does this workflow make sense in 2024?
Samuel Ramm: 35 mm solves some problems in LED stages and brings new challenges. In the future, there will certainly not only be analogue shooting in VP, but we have shown that VP and analogue film are not mutually exclusive criteria. It is possible to combine both and, depending on the project, it is also an advantage. If, as a director, I want to shoot a VFX-heavy project in 35 mm for aesthetic reasons and want to capture as many decisions as possible in-camera, I think it makes sense to shoot 35 mm in VP. Night scenes are also much easier to handle for analogue film in VP, but I’m sure Luis can tell you more about that.
Luis Zappe: There are definitely projects for which 35 mm in LED volume is the right choice of tools. You should allow plenty of time for tests during preparation, as the interplay between film and LED wall is difficult to predict in terms of colours and moiré and there is no real data on this yet. On set, I can recommend a second digital camera as a viewfinder, ideally with a LUT that simulates the emulsion used. This digital viewfinder allows you to assess the credibility of the ICVFX and still have the advantages of film in terms of colour and moiré in the footage.
DP: And what do you want to do now?
All: Thank you very much toeveryone who took part! Special thanks to Hyperbowl for getting involved in the whole thing. Lauritz Raisch was always on hand to give us expert advice and was extremely helpful and energetic in supporting us with all our specific problems and requirements. Without him, a lot of things would not have worked out. Adrian Weber also shared his experience with LED-Volume in combination with analogue film from his involvement with Poor Things with us. We are very grateful for the uncomplicated exchange! Studio L’Equipe from Brussels and Gilles Bissot in particular were also very supportive and helped us a lot with their expertise in film and digital intermediates. And last but not least, of course, oh, boy! films, without whom the project would never have been possible.
I am a cameraman and studied Audiovisual Media at the HdM in Stuttgart. I love telling special stories with images. What appeals to me most is thinking outside the box and looking for unconventional methods to create new images. Whether music videos, scenic or documentary projects; I love working in a team and always look forward to new challenges. is.gd/Luis_Zappe
I am studying Audiovisual Media Creation and Technology in the Master’s programme at the Stuttgart Media University. I love creating images and playing with colours. Whether at the camera, in VFX, grading or general post-production. I am enthusiastic about technical solutions for problems in design. is.gd/sebastian_burk
I am a director from Stuttgart. I often move artistically between documentaries and social commercials, always with the aim of focussing on people, topics and projects that are in danger of getting lost in the debate. My curiosity always drives me to try out technical innovations, whether light field, AI, Gaussian splatting or virtual production. www.samuelramm.com